How to Set a Dinner Table, From Everyday to Holiday
Where the forks, knives, glasses, and napkin go for an everyday dinner, a dinner party, and a formal holiday table, plus spacing, centerpieces, linens, and candles.
Most people know a few rules about setting a table: forks on the left, knife on the right, napkin somewhere nearby. Then a holiday arrives with a charger, three glasses, a bread plate, and a spoon lying sideways above the plate, and the rules seem to multiply. Hosts start to wonder whether they are about to get it wrong in front of the whole family.
There is a right answer, and it is simpler than it looks, because every table answers two separate questions. The first is the place setting: what goes where for one guest. The setting grows with the menu, but it follows one logic from a Tuesday supper to Thanksgiving. The second is the table as a whole: how far apart the places sit, how tall the centerpiece can be, what goes under it all, and how the table itself shapes the plan. None of it is about passing a test. A well-set table is about ease, for your guests and for you.
What is the basic rule for setting a table?
Forks go on the left, the knife and spoons go on the right, and every piece is laid out in the order it will be used, from the outside in.
The Emily Post Institute puts the whole system in a few lines: utensils follow the order of the meal, the knife blade always faces the plate, and you set only what the menu calls for. If no one is having soup, no soup spoon. If there is no bread, no bread plate.
One quick trick settles the two pieces people mix up most. Make a circle with the thumb and forefinger of each hand, under the table if you like. Your left hand forms a lowercase "b" and your right hand forms a "d." Bread goes on the left and drinks go on the right.
How do you set a table for an everyday dinner?
Set a dinner plate in the center, a fork to its left, a knife and spoon to its right, a water glass above the knife, and a napkin beside the fork or on the plate.
Every other setting builds on this one. Center the plate about an inch from the edge of the table. Lay the fork on the left, about half an inch from the plate, and the knife on the right with its blade turned toward the plate. A spoon, if you need one, goes to the right of the knife. Line up the bottoms of the flatware with the bottom of the plate, and the setting will look orderly even with mismatched pieces.
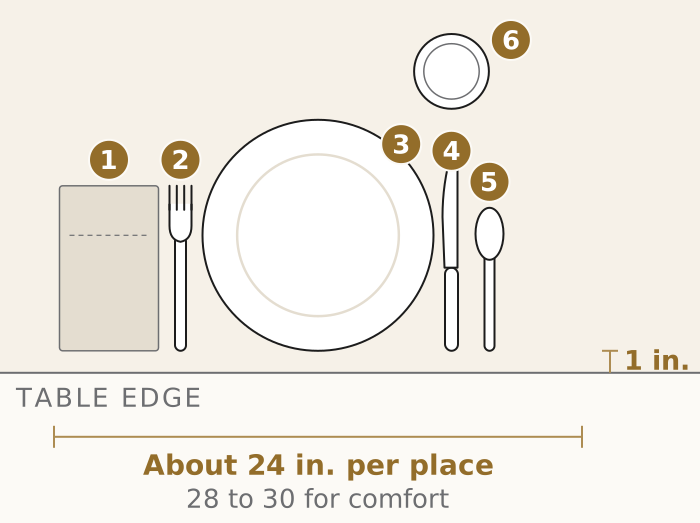
The napkin can sit to the left of the fork, under the fork, or folded on the plate. All three are correct, so choose whichever leaves the table looking calm.
How do you set a table for a dinner party?
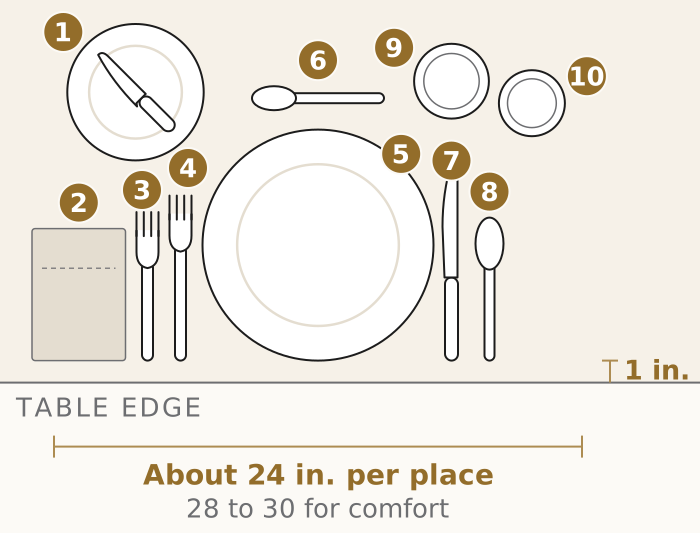
Add a second fork outside the dinner fork for a first course, a bread plate above the forks, a wine glass to the right of the water glass, and a dessert spoon above the plate.
An informal dinner party usually means two or three courses, so the everyday setting simply grows outward. A salad fork goes to the left of the dinner fork, because the salad comes first and you work from the outside in. The bread plate sits above the forks with a butter knife laid across it. Glasses stay on the right, with the wine glass beside the water glass. Emily Post's informal setting allows the dessert spoon or fork either above the plate or brought out with dessert, so set it ahead only if it saves you a trip.
How do you set a formal or holiday table?
Build on the dinner party setting with a charger under the dinner plate, a utensil for each course in order of use, dessert pieces above the plate, and glasses running to the right in the order they will be poured.
A formal setting follows the same logic with more courses. Here is how the pieces fall for a holiday dinner of soup, salad, a main course, and dessert:
- Charger: a larger decorative plate under the dinner plate. In strict formal service, as Emily Post describes it, the charger holds the early courses and is cleared before the main course. At a relaxed family holiday table, leaving it in place all evening is perfectly fine.
- Napkin: folded on the plate or charger, or to the left of the forks.
- Forks, left: the salad fork outside, the dinner fork inside.
- Knife and spoon, right: the dinner knife beside the plate, blade in, and the soup spoon outside it, since soup comes first.
- Bread plate: upper left, above the forks, with the butter knife across it.
- Dessert spoon and fork: above the plate. The spoon sits on top with its handle to the right, and the fork sits below with its handle to the left.
- Glasses: upper right. The water goblet goes directly above the knife, wine to its right, and a champagne flute for the toast farthest right.
- Place card: if you use one, above the dessert pieces.
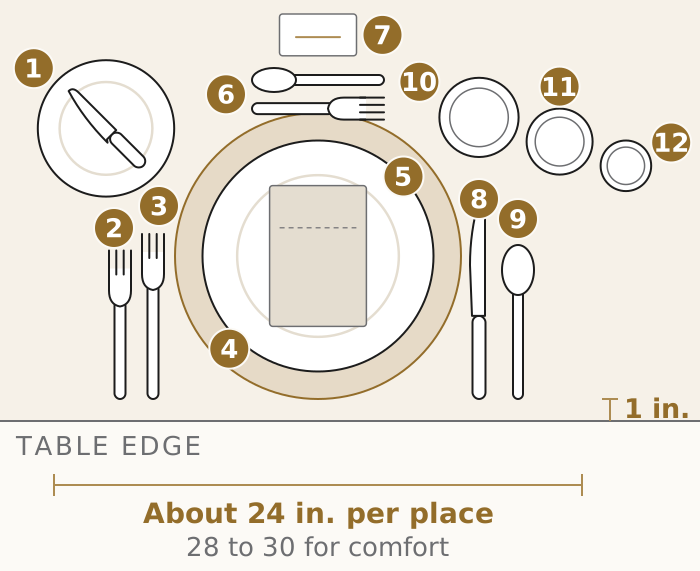
Emily Post caps the table at three of any one utensil at a time. If your menu runs longer, bring the extra pieces out with their courses rather than crowding the setting.
How far apart should place settings be?
Allow about 24 inches from the center of one place setting to the center of the next, and 28 to 30 inches when you want real comfort or are using armchairs.
Twenty-four inches holds a plate, flatware, and two elbows that do not collide. Set each plate and the bottoms of the flatware about an inch in from the table edge, a measure used in the Oregon State University Extension table setting guidelines.
The same inches decide how many people a table truly seats. Our guide to dining table sizes for 6, 8, 10, or 12 works through the lengths, round diameters, and walkway clearances behind those numbers.
How tall should a centerpiece be?
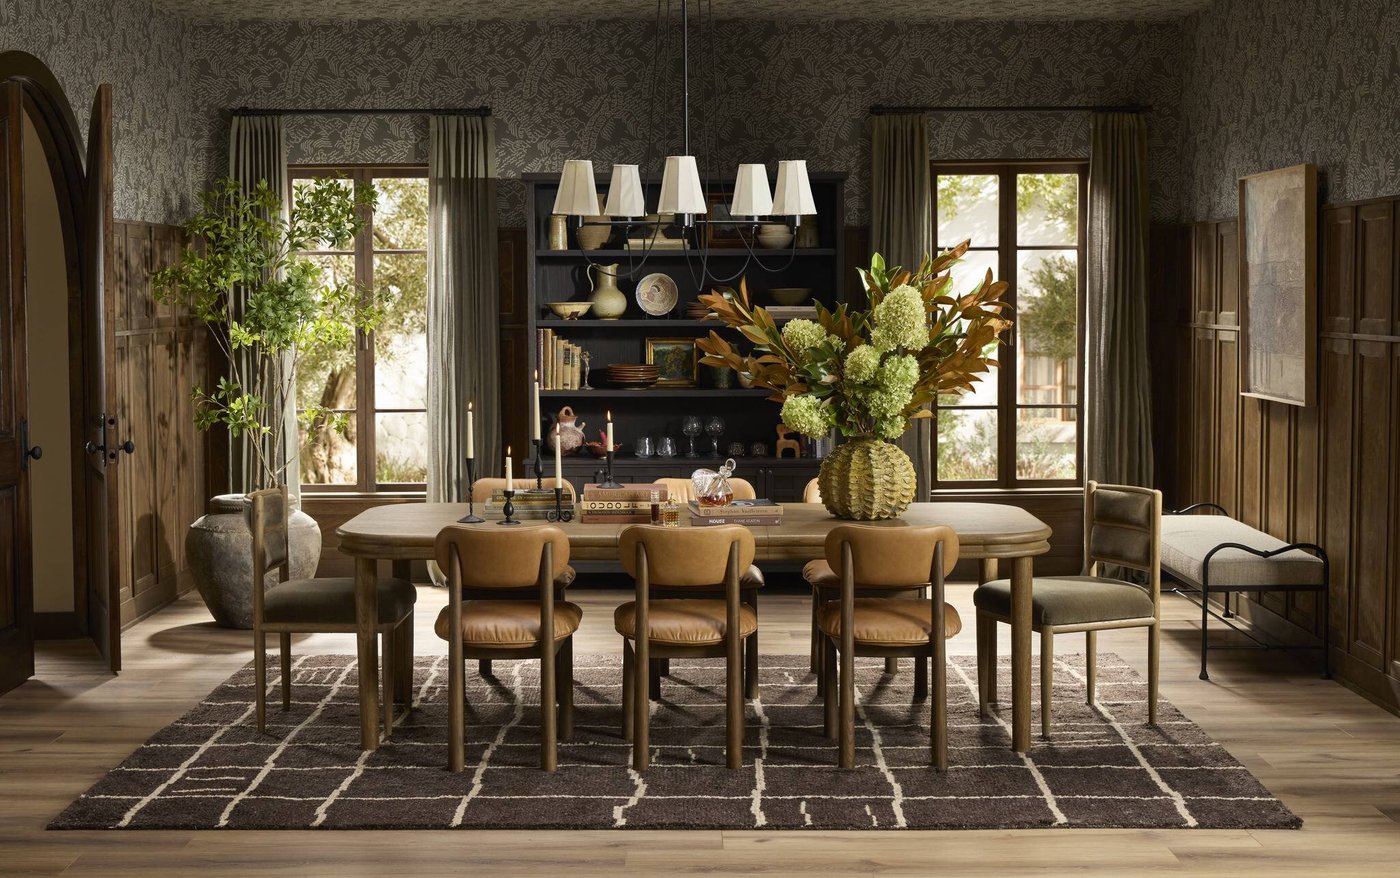
Keep a centerpiece low enough that seated guests can see each other across it, roughly 12 inches or lower, or choose one tall and slender enough to see beneath.
The test is simple: sit down and look across the table. If you cannot see the face opposite you, the arrangement is too tall for dinner. Low, long arrangements suit a rectangular table, and a single low arrangement suits a round one. Leave room down the middle for serving dishes if you plan to pass food family style.
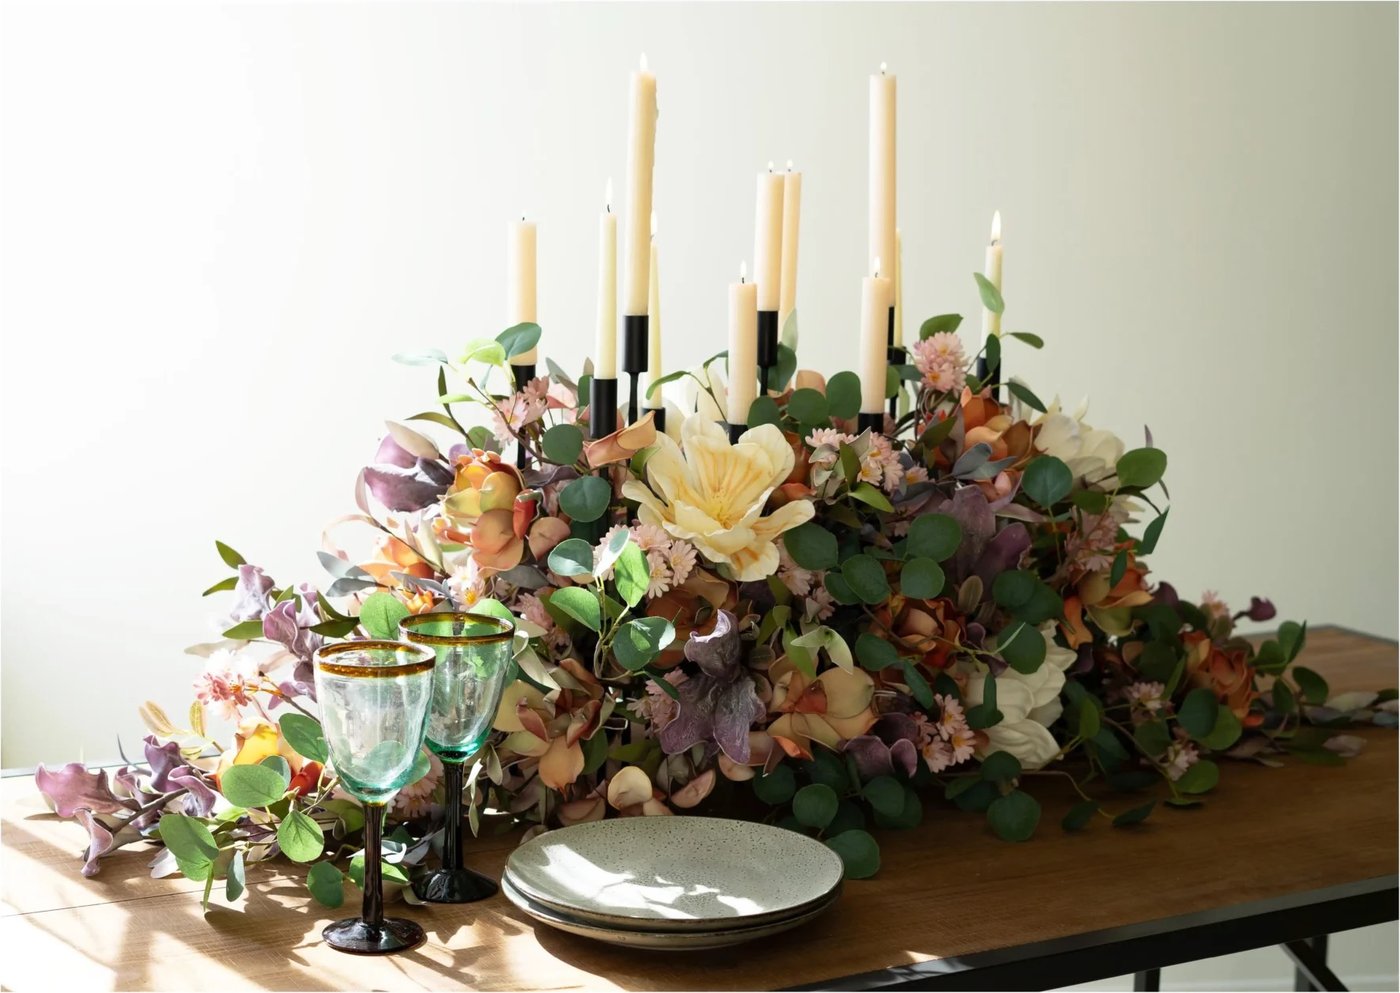
Use unscented candles at the table. The Oregon State guidelines note that a centerpiece's scent should not clash with the food, and a fragrant candle competes with dinner. Save the scented ones for the entry and the living room. Keep greenery and linens clear of open flames, and set candles where a reaching arm will not pass over them.
Should you use a tablecloth, a runner, or placemats?
Any of the three is correct, so choose by the occasion and by the table: a tablecloth for the most formal look, a runner to show off a beautiful top, and placemats for everyday ease.
A tablecloth should hang evenly with a drop of about 8 to 10 inches on every side, the range the Oregon State guidelines give. A longer drop, around 15 inches, reads more formal. To size one, add twice the drop to the table's length and width.
A runner down the center lets a handsome wood or stone top show while protecting it from serving dishes and candleholders. Placemats sit even with the table edge or an inch or two in, and they keep each setting tidy without covering the whole table. On a wood table, placemats, runners, coasters, and trivets do real work against heat and moisture, a point our guide to caring for wood furniture covers in more depth.
How do you layer a holiday tablescape?
Build from the bottom up: linens first, then chargers and plates, then napkins and flatware, then glasses, and finally the centerpiece, candles, and place cards.
Working in layers keeps a holiday table from tipping into clutter:
- The base. A tablecloth, a runner, or the bare top of a beautiful table.
- Chargers and plates. One color story, or a deliberate mix in two or three tones.
- Napkins and flatware. Napkin rings or a sprig of greenery add the holiday note without adding height.
- Glassware. Water goblet first, then wine, then a flute for the toast.
- The centerpiece. Low and long, built from seasonal greenery, fruit, or small vessels.
- Candles. Unscented, grouped in odd numbers, tapers or votives.
- Place cards. The finishing layer, and the easiest way to seat a large family without a scramble.
Step back after each layer. The best holiday tables often come from taking one thing away before the guests arrive.
Does the shape or material of the table change how you set it?
Yes. A round table gathers settings around one shared center, a rectangle sets them in two rows with ends to anchor, and wood and stone tops each want their own kind of protection.
On a round table, each setting points toward the center like the spokes of a wheel, and one low centerpiece serves everyone. On a rectangle or oval, a runner and a line of low pieces carry the eye down the length, and the ends become natural seats for the hosts. Our guide to round versus rectangular dining tables compares how each shape hosts. If your guest count swings from six to twelve, the extendable versus fixed tables guide explains how leaves change the plan.
Material matters too. Wood welcomes placemats and a runner. Marble can etch, leaving a dull spot, when it meets acids such as wine and citrus, so the Natural Stone Institute recommends coasters and trivets. On a stone table, set a coaster or small plate under every wine glass.
Finally, look behind the chairs. A sideboard or buffet turns into a serving station, a bar, or a dessert table, which frees the dining table for the settings themselves. Leave 42 to 48 inches between the table and the sideboard so guests can serve themselves without squeezing past seated diners. Our guide to sideboards, buffets, and credenzas covers heights and sizes.
Where can I see dining tables set in Kansas City?
The Seville Home showroom in Leawood keeps dining tables and chairs on the floor, so you can sit at a table, try the chairs, and picture your own holiday settings at full scale.
Bring your guest list and your room measurements, and a designer will help you match a table, chairs, and a sideboard to the way you host. Visit us at 5205 W 135th Street in Leawood, Monday through Saturday, 10 a.m. to 5 p.m., or browse our dining collection before you come. Our designers offer complimentary design consultations, in the showroom or in your home, and directions are on our visit page.
Common questions
How do you set a dinner table properly?
Put the forks to the left of the plate and the knife and spoons to the right, with the knife blade facing the plate. Lay utensils in the order they will be used, from the outside in. The water glass goes above the knife, the bread plate goes above the forks, and the napkin goes to the left of the forks or on the plate. Set only the pieces the menu needs.
Where do the glasses go in a formal place setting?
Glasses sit at the upper right of the place setting, above the knife and spoons. The water glass or goblet goes directly above the dinner knife, and wine glasses go to its right in the order they will be used. A champagne flute for a toast sits farthest to the right.
How far apart should place settings be?
Allow about 24 inches from the center of one place setting to the center of the next as a minimum, and 28 to 30 inches for real comfort or for armchairs. Set the dinner plate and the bottoms of the flatware about one inch in from the edge of the table.
How tall should a dinner table centerpiece be?
Keep a centerpiece low enough that seated guests can see and talk across it, roughly 12 inches or lower. A very tall, slender arrangement that rises well above eye level can also work. A tall bouquet that blocks the view looks lovely between meals and can move to a sideboard when guests sit down.
Where does the dessert spoon go when setting a table?
The dessert spoon and fork can be set horizontally above the dinner plate. The spoon goes on top with its handle to the right, and the fork goes below it with its handle to the left, so each is easy to slide down into place when dessert arrives.